Simple Bubble Art: Creative Painting Techniques for Novices
Bubble Art: A Creative Art Form for Beginners
Have you ever gazed at soap bubbles floating in the air and wished you could capture their beauty and whimsy in a piece of art? Well, rest assured, you can indeed! Bubble Art is a delightful and easy technique for painting that every beginner can master and enjoy.
I still recall the first time I indulged in bubble painting with my niece and we both were equally fascinated by the organically beautiful patterns created from this simple technique. The joy and excitement in her eyes were indeed priceless and I was thrilled as well.
Why Bubble Art is an Exceptional Art Form?
Bubble Art is not just about the joyful experience of blowing bubbles but also about the pleasure of creating something beautiful. The outcome of Bubble Art is unpredictable - each piece of artwork is uniquely beautiful, which is part of its allure.
This painting technique is also forgiving. In the realm of Bubble Art, there are no wrong strokes - only fortunate mishaps that often result in something extraordinary.
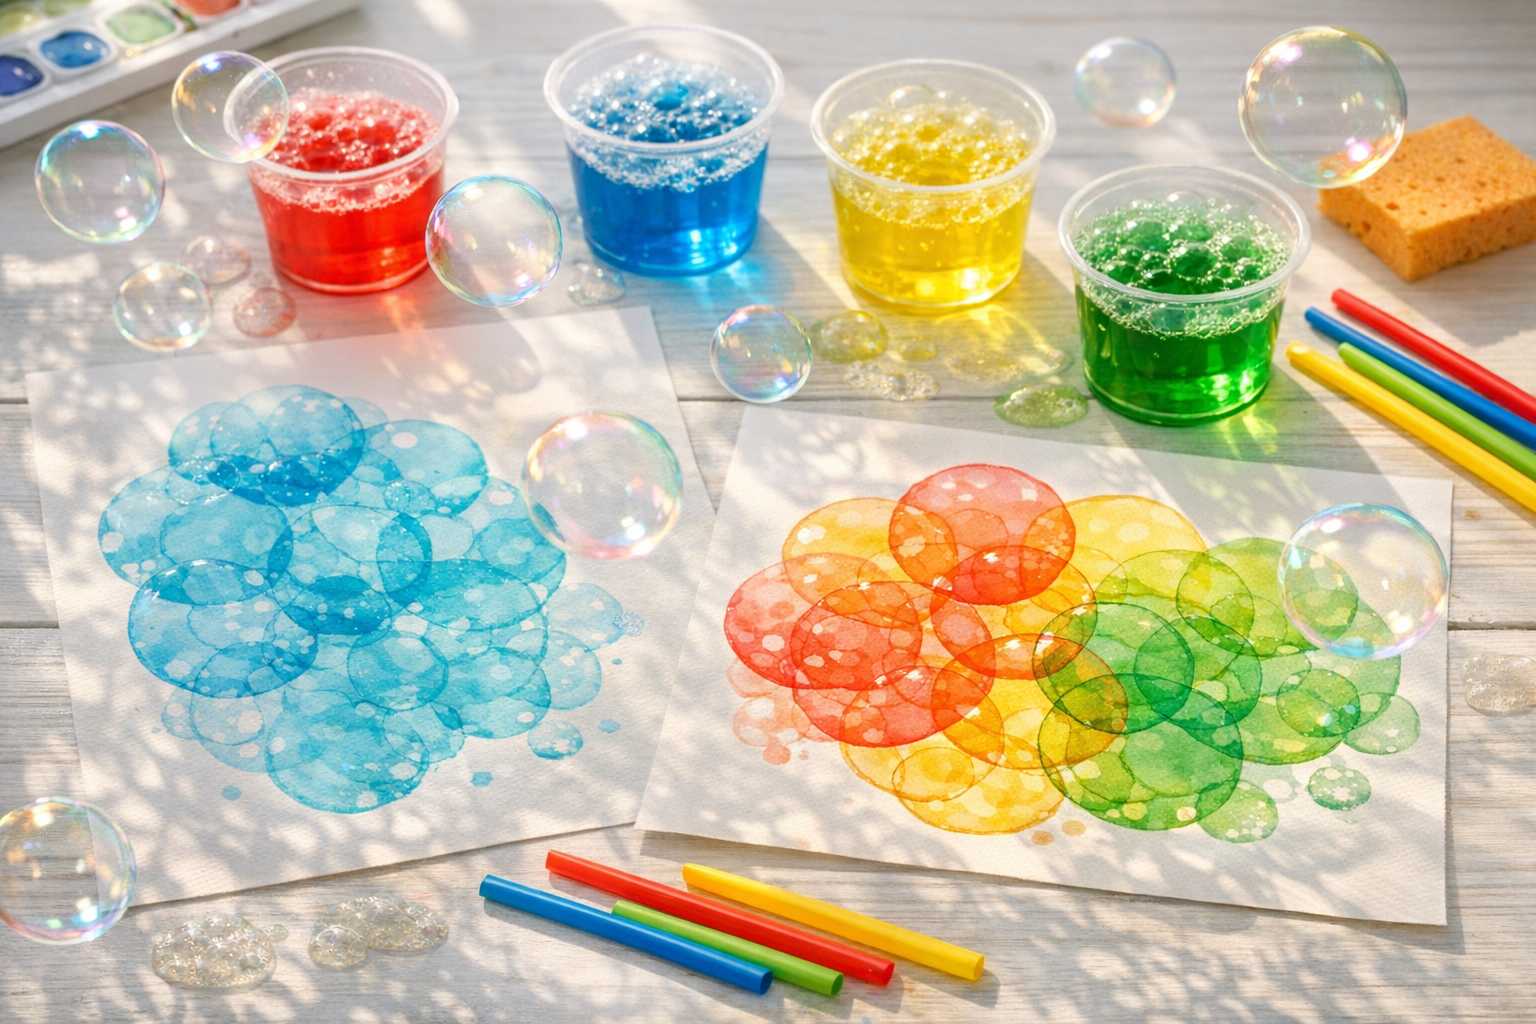
The Must-Have Supplies for Your Debut Bubble Art Creation
Getting started with Bubble Art is fairly simple. The chances are that you have most of these items at home:
- Liquid watercolor paints or food coloring
- Dish soap (Dawn is a great option)
- Water
- Plastic cups or containers
- Drinking straws
- Heavy cardstock or watercolor paper
- Paper towels for cleanup
Bubble Art's beauty lies in its simplicity. You don’t need luxurious supplies or years of expertise to create something awe-inspiring.
Understanding the Basic Technique of Bubble Art: Creating Your First Art Piece
Let me guide you through the basic technique step-by-step. Trust me, it's simpler than it appears!
Step 1: Preparing Your Bubble Solution
Mix equal parts of water and dish soap in a plastic cup. Add a few drops of liquid watercolor or food coloring. Starting with one color might help you get the hang of it.
Ensure the mixture is soapy enough to form sturdy bubbles but not too thick to blow comfortably.
Step 2: Creating Colorful Bubbles
Submerge your straw into the colored mixture. Blow gently to form bubbles on the surface. Aim for a solid layer of bubbles resting on top of your solution.
Be patient during this step. More bubbles result in a more intricate final art piece.
Step 3: Capturing the Bubble Magic
Delicately place your paper on the bubbles. Do not press hard - merely let the paper brush the bubble-filled surface. The bursting bubbles will leave delightful circular impressions behind.
Carefully pull up the paper and marvel at your first bubble imprint! Each circle will flaunt a unique ring pattern.
Advanced Techniques to Enhance Your Artwork
Once you get the hang of the basics, try out these creative methods to add an extra spark to your bubble art.
Layering Multiple Colors
Create several cups filled with solutions of different colors. Use one color at a time, allow it to dry slightly, then add prints from the next color. The overlapping results in astonishing depth and complexity.
It's beautiful how unexpected color mixtures can emerge from layering multiple colors. The most beautiful pieces often surface from unlikely color combinations.
Varying the Size of Bubbles
By using different tools, you can create a range of bubble sizes. While straws are good for medium-sized bubbles, experiment with:
- Wide straws for larger bubbles
- Coffee stirrers for tiny bubbles
- Bubble wands for giant bubbles
This variation in sizes adds visual interest and gives your compositions an increased dynamism.
Adding Textural Effects
Play around with different papers and surfaces. While watercolor paper yields neat prints, textured paper leads to more organic, soft effects.
You can even give fabric a shot! Bubble art works beautifully on T-shirts and canvas bags.
Seasonal Cards and Decorations: Beginners Project Ideas
Greeting Cards with a Twist
Bubble art can transform greeting cards into mini art pieces. The unique patterns make for incredibly beautiful birthday cards, thank-you notes, or just simple messages.
Simply fold a cardstock in half and form bubble prints on the front surface. Insert a sweet message inside, and voila! You have a bespoke card that’s hard to find in any store.
Artistic Seasonal Decorations
Tailoring your bubble art to different seasons is a great way to create timely decorations:
- Red and green bubbles for Christmas ornaments
- Orange and yellow for autumn leaves
- Spring-themed pastels
- Blue and white bubbles for winter scenes
Abstract Wall Art
You can create a series of bubble paintings in coordinating colors and frame them for superb wall decor.
The abstractness of bubble art complements any home decor style. Be it modern, traditional, or eclectic - bubble art fits in beautifully everywhere.
Solutions to Common Bubble Art Obstacles
Bubble Formation Issues
If your bubbles aren't forming properly, it's likely due to your soap and water ratio. Add more soap if the mixture is very watery and add more water if it's too thick.
Pale Colors
For brighter results, use less water while creating your solution. Liquid watercolors generally produce more intense colors than food coloring.
Messy Prints
This usually happens when the paper is too wet or you're pressing too hard. Allow the excess solution to drip off before pressing and use a gentle touch.
Important Tips for Success and Safety
Work in a Ventilated Area
Bubble solutions can get messy, and some individuals might be sensitive to soap bubbles in the air. Working in a well-ventilated area ensures the experience is comfortable for everyone.
Protect your Workspace
Lay down newspapers or plastic sheets to cover your work surface. Predictably, bubble art can be messy - but that's all part of the fun!
Make it a Family Activity
This technique is a great way to get the entire family involved in artistic creativity. The bubble-making process is thrilling for kids while adults can appreciate the beautiful outcomes.
Preserving and Showcasing Your Bubble Art
Dry it Out Fully
Allow your bubble art ample time to dry before handling, keeping in mind that the soap in the mixture makes the drying process a bit longer than conventional watercolor.
Consider Framing Your Artwork
Bubble art, especially when framed, looks outstanding. Its naturally elegant patterns pair perfectly with simple, clean frames.
Record Your Creativity
Take photos as you go along, it's great to look back and see how the different techniques led to varied effects.
Enhancing Your Bubble Art Skills
Practice is Key
Like any artistic endeavor, bubble art improves with practice. Every session teaches you something new, be it about color mixing, bubble formation, or pattern creation.
Although your first attempts might not align with your visualized result, remember every artist begins somewhere, and bubble art is particularly forgiving for beginners.
Experiment Without Fear
The best bubble art pieces are often a result of experimentation. Play around with different color combinations, various kinds of paper, and a variety of tools. Some of my favorite pieces were accidental discoveries while experimenting.
Connect with Online Communities
There are numerous online communities where bubble art enthusiasts share their techniques, ideas, and motivation. Social media platforms have active groups where both beginners and professionals exchange valuable insights.
Conclusion: Your Journey to Bubble Art Begins Now
Bubble Art presents a world filled with endless creative possibilities that are both captivating and easily accessible. To create something remarkable, you don't need to be an accomplished artist; all you need is curiosity and the readiness to experiment.
The techniques we've discussed today will set a solid base for your bubble art journey. Still, remember the most crucial learning happens during the creation process itself. So, assemble your supplies, arrange your workspace, and begin experimenting!
Every bubble that pops on your paper offers a little miracle of color and pattern. Revel in the unpredictability, cherish the fortunate mishaps and most importantly, enjoy!
Your first Bubble Art masterpiece is only a few bubbles away. What are we waiting for? Let's begin creating!